

Part-One: Introduction to GIT Basics — Part One
Welcome back again, in Part One we discussed a very basic concept about Git and how we can sync local and online repository. In this article let’s go furthermore and I am sure this will be going to be great fun to learn. Let me tell you a story before getting started.

The Story — Part 1
There was a city called Git where people used to travel there to talk to each other and spend time discussing their ideas. That place was owned by powerful people like GitHub, Azure DevOps, GitLab, Heroku, Bitbucket, and other board members. They all had their share in the land. But GitHub guy is the oldest member of the board but creative. His experience and share were immense in the land. He owned almost half of Git. So, what he introduced was, he made his land a wonderland and made it accessible to all people. Where they can set up stores of their own and share it with the public or they can make it private. These stores are called repositories. Public stores are called open source and private stores are called closed source (Proprietary). There are different privileges for each type of stores, those privileges are mentioned below.
- Open Source or Public: These stores/repositories can have owners and those owners can always have keys to the door, but they never lock doors for the people to come and contribute to their stores. Everyone is welcome including all ages. There is no restriction except one, owners can have the rights to monitor the change in store and accept/reject any changes people submit.
- Closed Source or Private: Private repositories are those in which only people who are close to the owner or a group of people can only enter the store and make changes. It is closed for public and it is like they are hidden underground and those who have access will know this exists.
For this time, I feel the story is good enough and the rest of the story will continue in the next parts as this is a ten-part series. In this article further, we will discuss the following things,
- Cloning/downloading repository
- How to edit README.md file and the markup for writing in it.
- We will push the changes that we did to the README.md file to the online git repository.
- Overview of all git commands learned so far
- Conclusion
Cloning/downloading repository
Cloning a repository means, downloading the repository as it is in the online version to your local machine. It is almost like downloading the code. To clone a repository, you can directly visit any repository you want and copy the URL of it, and you need to execute the command in the CLI of your system/machine.
$ git clone <URL of the repository>
Note: git clone and git pull are 2 different commands. The major difference between them is, git clone downloads the code, but git pull gets the code from the online repository only when it is connected to it.
Pulling Source Code from Online Repository:
As soon as we connect to the Online repository, we need to pull the code that is existing in it. So, to pull the latest code in the repository, use the below command,
$ git pull origin master
Note: In this example, we are executing this command as soon as we connect to the online repository that is at the end of part one because we already initialized it with README.md while creating repository and GitHub created a file for us. So, if the file is there in the online repo and not in offline means, it is not in sync so we are updating our local repo with the latest changes and files with the online repo.
How to edit README.md
This time I will take you through to the important basic concept of any Project — Documentation. Every project needs to be documented with every detail to make sure everyone who is involved in the project is on the same page. So, for documenting purpose we use .md file and it is a markup file which contains details about the project and the source code that is hosted in the repository.
Let’s learn about it. Do you remember in our previous article, we synced both online and offline repository? Now it is time for us to go to that folder in your machine.
In that folder, we can see a README.md file that is there. So, you need to open that file. You can open that file using Notepad, VS Code, or any code editor of your choice. Once you open the file you may see just an empty file. That is how it looks at the start. Paste the below lines to that file, I will explain each line mark-ups below.
# git-training h1
## git-training h2
### git-training h3
#### git-training h4
##### git-training h5
###### git-training h6Markup options (Paragraph)
[Link](https://google.com)**Training** *of Git* and _its basic_ __concepts__1. List 1
2. List 2* Unordered List 1
* Unordered List 2
Basic Markup/Markdown Source Formatting:
Note: The format of the file must be .md for formatting to work. Also, you can see the formatted text once you push it to the repository. The formatted text will not be visible in any editors. If we open .md file in any editors, it will look like the above code. Upon uploading to the repository, these texts and special characters will get formatted into a readable view.
1. Headings:
Headings are of 6 types in English and so does in markup language as well. In Markdown source, we use # to define the headings, so if the text is preceded by # and space, interpreter considers the whole line as heading 1 (H1) which is the biggest of the other 5. Likewise, if we use ## and space, it will become heading 2 (H2) and it is a bit smaller compare to heading 1 (H1).
# git-training h1
## git-training h2
### git-training h3
#### git-training h4
##### git-training h5
###### git-training h6
2. Paragraph:
Paragraphs are plain text that we insert in the file. There is so specific character to mark this so we can simply write text whatever we want without using any of the special characters.
Markup options (Paragraph)
3. Links:
Adding links to the file is a little tricky. To display the link in any page, we need an identifier text that helps us to understand that as a link and another is the URL or Web address to where that link points to. Below is the syntax of it,
[Link](Web Address)
[Google](https://google.com)
4. Text Style:
There are 2 basic styles we can add to the text. Bold and Italic.
Bold: To make text bold in the markup text, we can use 2 ways, One, we can enclose any word or sentence with ** and ** (At the start and end both). Two, we can use __ and __ (Double underscore at the start and end).
Italic: To make text italic in the markup text, we can use 2 ways, One, we can enclose any word or sentence with * and * (At the start and end both). Two, we can use _and _ (underscore at the start and end).
**Training** *of Git* and _its basic_ __concepts__
5. Lists:
We have 2 types of lists, Ordered and Unordered lists
Ordered List: To create an ordered list, it is straight forward. We just need to use 1. and space and it will automatically consider this as an ordered list. For the next number, go to the next line and add 2. and space and so on.
1. List 1
2. List 2
Unordered List: To create an ordered list, it is straight forward. We just need to use * and space and it will automatically consider this as an ordered list. For the next number, go to the next line and add * and space and so on.
* Unordered List 1
* Unordered List 2
Pushing Code to Online Repository
To push code to GitHub we need to use 3 GitHub commands. git add, git commit and git push
We edited the readme file and the changes are done in our online repository. So we need to push the change to online. How are we gonna do that? Follow me in here,
- In our command line, we first need to navigate to the folder where the local repo is connected to online. Execute the command as given below,
$ git add <filename/folder/wildcards>In this case, I will execute,$ git add *This means we are adding all the files in the local repo to push it to online. We can specify file name or folder name instead of * as well so that whatever you mention, it will add that to commit.
- After adding files to git local, we need to commit the change so for that we use git commit command with the flag -m
$ git commit -m “<Commit Message>”In our case, we use,$ git commit -m “Initial commit”
- The final step in sending all the changes online is the git push command.
$ git push origin master
Note: git push origin master tells local git to push the changes that are committed to online with the origin which we set up earlier and to the master branch (I will explain about branches topic in my next parts.)
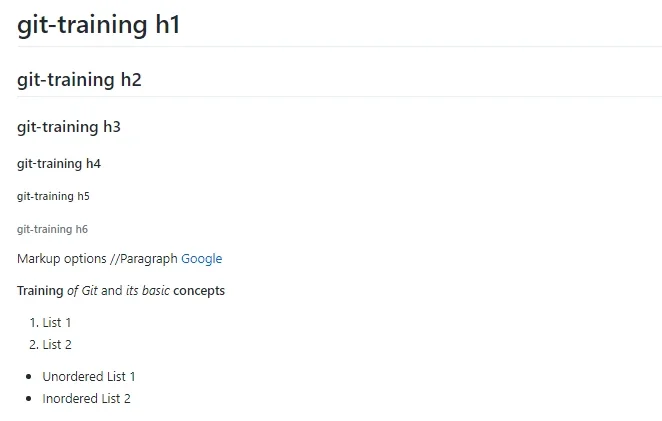
Finally, this is how the README.md file is formatted in the GitHub online repository.
Git Commands We Learnt So Far
- Git clone (URL): The git clone command is used to copy an existing Git repository from a server to the local machine. This creates a directory called the project name on the local machine, containing all the files in the remote Git repository. This includes source files for the project, as well as a .git sub-directory which contains the entire history and configuration for the project.
$ git clone <URL of the repository>
- Git init: creates a new Git repository. It can be used to convert an existing, non-versioned project to a Git repository or initialize a new, empty repository.
$ git init
- Git remote: After the local repository is validated, the next step is to create a remote repository that the local repository will connect to.
git remote add origin <URL of the Repository>
- Git pull origin master: Pull operation copies the changes from a remote repository instance to a local computer.
$ git pull origin master
- Git add: command to add new files to the local git repository.
$ git add <filename/folder/wildcards>
- Git commit: command to commit changes to the local git repository. The changes can be any new files added or any existing files content updated.
$ git commit <flags>
Eg. $ git commit -m “Initial Commit”
- Git push: Push operation copies changes from a local repository instance to a remote one. This is used to store the changes permanently into the Git repository.
$ git push origin master
Conclusion:
So, till now we learned 7 Git commands and also basics about markup language. If you remember, we use markup language everywhere but it different ways like WhatsApp, Instagram, and other social media platforms.
Let us remember who founded Git. Ever since Git was founded, companies and technology taken a great leap in working together. Without Git or Version control system, our software development never would have been this collaborative and fast. Git was founded by Linus Torvalds and he said about Git in his interview,
“You can do a lot of things with git, and many of the rules of what you *should* do are not so much technical limitations but are about what works well when working together with other people. So git is a very powerful set of tools.”
Please find the links below to download and Install Git in your system.
Installation:
- GitHub for Windows: https://windows.github.com
- GitHub for Mac: https://mac.github.com
- For Linux and Solaris platforms: https://git-scm.com/download/linux (The latest release is available on the official Git website)
- Git for All Platforms: https://git-scm.com
Thank you so much for reading and understanding the basics of Git. In Part 3 we are going to discuss something special. We learn about how 2 or more people work on the same file at the same time and then can merge their changes successfully to the code. Until then, Goodbye.
Happy reading, keep learning and if you have any doubts please feel free to contact me at harithsa@thenexteam.com or sushmita@thenexteam.com
Credits: Sushmita Shet